Building NX09
Steps
1. Overview
2. Idea
3. System designing
About Arduino
About Servo
About Battery
4. Structure designing
About 3D CADNEW
5. 3D printing
6. Making servo shieldNow Preparing
7. Making wiring harnessNow Preparing
8. AssemblingNow Preparing
9. Programing for ArduinoNow Preparing
10. Creating motionsNow Preparing
1. Over view
We build simple biped a robot with 4 motors (servo). The appearance is this picture, and it walks like this movie.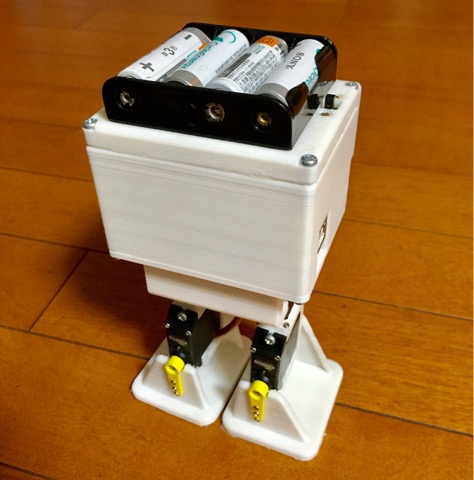
Main Components
・Servo Micro2BB x4
・Arduino UNO Control board
・Servo shield (DIY with Sanhayato universal board)
・NiMH AA battery x4
・ battery
・Servo brackets and case made by 3D printer
You cannot understand what they are now, but I will explain them.
2. Idea
Firstly, what type of robots do you want to make? At the first stage You can't make some circuits by soldering or some parts by 3D printer. You should draw your robot on paper. I say "Ponchi-e" about such a drawing. It may be the best time to image the robot you want to build. I drew many Ponchi-e.

3. System Designing
System
・Arduino
・Servo x4 GWS Micro2BBMG
・9V Battery Power Supply for Arduino
・NiMH Batteries AA 1.2Vx4 Power Supply for Servos

About Arduino
The servos are controlled by computer boards. In this time we use Arduino as control boards. Arduino was developed in Italy as for prototyping. There are many type of Arduino in the world. We use Arduino Uno that is most popular in this project. Arduino UNO is available for about 4,000 yen. You can write the code easier than general microcomputer. And Arduino has library for servo control so that you can write very easy code for servo controlling.


About Servos
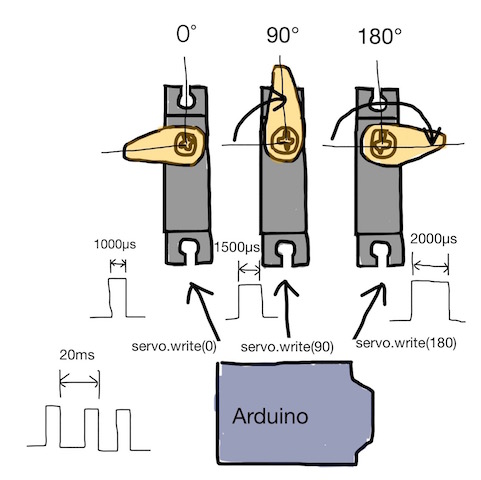
General DC motors rotate continuously if inputed constant voltage. The servo sustain specified angle. The angle value is send as 0 - 180 degrees from Arduino.
Arduino imputs angle 0-180° to servos. Actually,it trasmit pulse width according to angle.
The servos of NX09 GWS Micro2BBMG
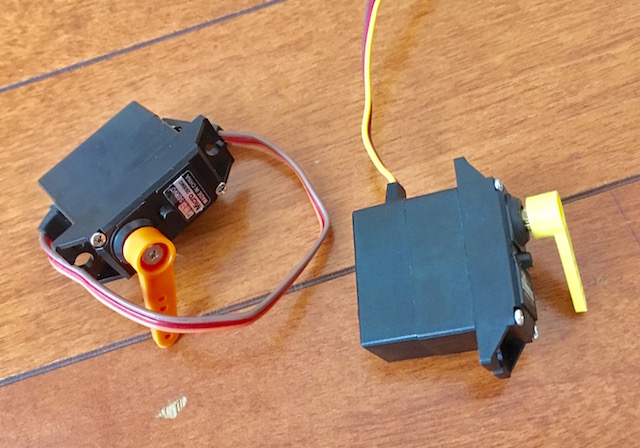 Torque 5.4kg-cm@4.8V
6.4kg-cm@6.0V
Speed 0.17sec/60°@4.8V
0.14sec/60°@6.0V
Weight 26.6g
Dimensions 27.9mmx14.0mmx29.7mm
About Battries
Arduino UNO works in 9V battery. In case of operating servos, general alkaline and manganese batteries are not enough in capacity of current, so that we use NiMH batteies.


4. Structure Designing
The brackets for servos and control boards are made with aluminum plate bended and cut or 3D printed. Previously, I made brackets by bending aluminum plate. It is hard to make it, so that we make one by 3D printing in this project. I will explain how to make aluminum flames in another opportunity.
We design all parts by using 3DCAD Fusion360.
About 3D CAD
Recently, there are many free 3D CAD. Creo Parametric, Autodesk Inventor and others 3D CAD cost about $1,000, but we can't use such expensive software. So we use free 3D CAD. I recommend Autodesk Fusion360. It's free for academic use and less than $100,000 buisiness use. It's good solution for armature robot builders.
This software is easy to install. You can find the download site on Google as Autodesk Fusion360. You must regist your personal information for getting account. Your data will be saved on cloud, so that you use this account always.

Let's get start modering a servo. Firstly measure the dimentions of servo. Basic modering of 3DCAD is extrusion. Sketch shapes on a surface and extrude. Holes are extruded from sketch as well. And you put chamfers and rounds. I put a movie as the reference.
Update
- 2017.6.183D CAD information was updated.NEW
- 2017.6.10NX09 page was updated.
- 2017.6.4NX09 page was made.